【Note: The following is chat content. Start directly with the local deployment tutorial. Please go to the middle part of the article.】
These distillation models are not the real DeepSeek-R1, as I have mentioned before in a post:Wake up! The DeepSeek-R1 you deployed locally is not R1.。
But this does not mean these models are poor, nor does it mean I do not recommend deploying and using them.
On the contrary, the base models of these distillation models are themselves excellent open-source models widely used for local deployment. Moreover, after distillation by DeepSeek, their performance has improved.
This brings us to several technical achievements from the DeepSeek team’s process of training DeepSeek-R1.
① Applying reinforcement learning (RL) directly on the base model, skipping supervised fine-tuning (SFT).
Supervised fine-tuning (SFT) is a standard step in training large language models, where the pre-trained base model is fine-tuned using high-quality labeled data (such as human-written Q&A pairs, task examples, etc.) through supervised learning. It’s like a teacher (human) telling a student (the model, specifically DeepSeek-V3): I’ve checked these problems and answers, they are correct, go ahead and learn from them.
This learning process is reinforcement learning (RL). Reinforcement learning relies on a reward mechanism. Using the previous example, the student takes the problems and answers given by the teacher and starts solving them on their own. When the student arrives at an answer that matches the correct one, the teacher rewards them with a small red flower.
DeepSeek’s first major research achievement was skipping the supervised fine-tuning step and proceeding directly with reinforcement learning. They adjusted the reward model from the traditional approach of rewarding for correct answers to rewarding for logically coherent problem-solving processes, ultimately significantly enhancing the model’s reasoning capabilities.
The model trained using this method is DeepSeek-R1-Zero.
② Based on the innovative methods validated on R1-Zero, they redesigned a training method that combines supervised fine-tuning to train DeepSeek-R1.
Why is the model we ultimately use R1 and not R1-Zero? Because although R1-Zero explored the limits of reasoning, it lacked supervised fine-tuning, resulting in weaker general language capabilities and potential safety issues.
Therefore, building on the research findings from R1-Zero, DeepSeek redesigned the method for training R1 and produced R1. (Note: R1 was not trained on the basis of R1-Zero; instead, they were trained in parallel, sharing the reinforcement learning methodology.)
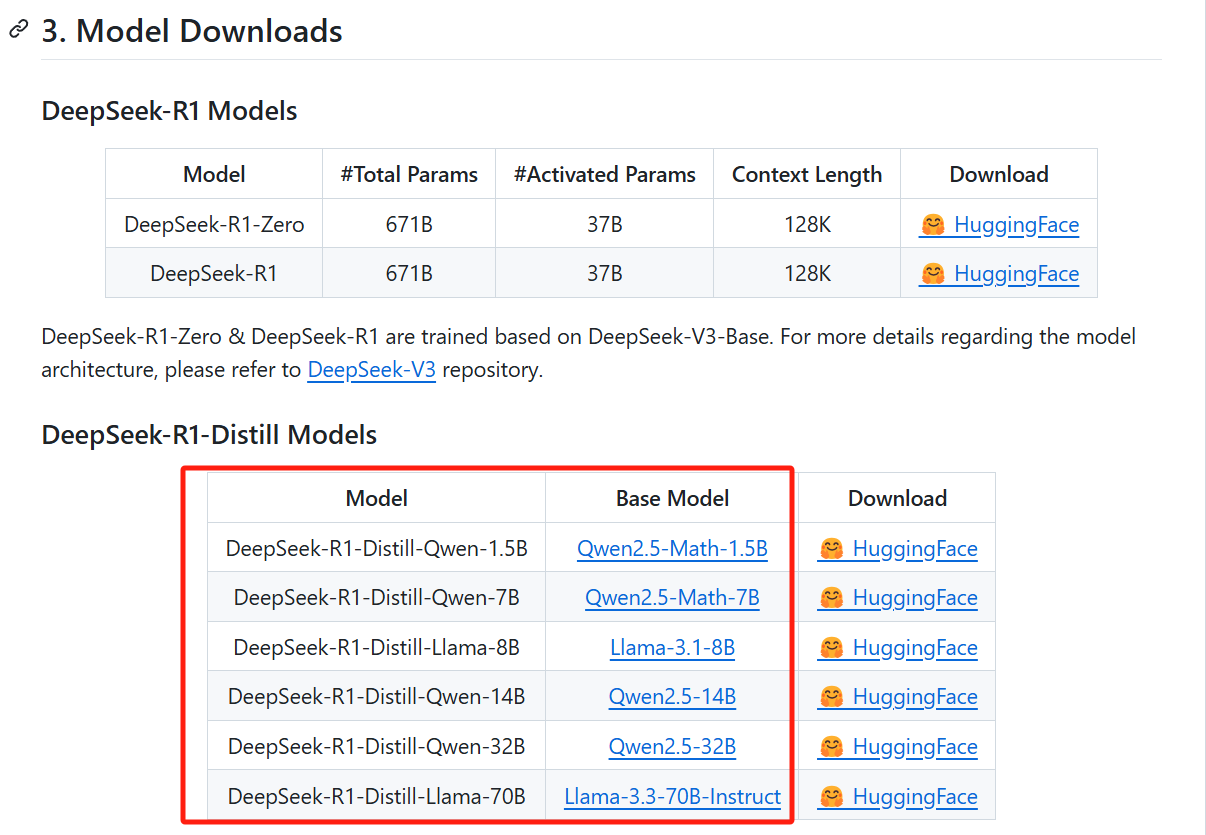
③ Validated that the reasoning patterns from distilling larger models can be used to enhance the performance of smaller models.
It can also be said that DeepSeek designed a new distillation method, and the products of this new distillation are the small-sized DeepSeek distillation models discussed in this article.
Traditional distillation focuses on having a smaller model learn the output results (probability distribution) of a larger model, for example, having a compact model learn GPT’s output so that its own output eventually approximates GPT’s. In contrast, DeepSeek’s distillation approach not only involves learning the output results but also requires the smaller model to learn the larger model’s reasoning process. For instance, it involves having Llama-3.1-8B learn the reasoning data of DeepSeek-R1 (671B).
Simply put, one is just learning the answer, while the other is learning the problem-solving process along with the answer.
The conclusion verified by the DeepSeek team is that by learning the problem-solving process, the reasoning capabilities of the base model itself are significantly enhanced.
It’s like that story: a baby’s mother boasts that her child can already do addition and subtraction within 10, and wins applause during a public performance at New Year’s. Then a straightforward middle school student asks: ‘Why?’ The baby can’t explain because it only memorized the answers without truly learning how to calculate.
Moreover, this method is superior to having the small model discover the reasoning process on its own through reinforcement learning via method ①. This is not hard to understand: DeepSeek-R1-Zero’s training base model is the 671B DeepSeek-V3, which is large enough to allow for the emergence of reasoning capabilities. Smaller models, such as Qwen-2.5-Math-1.5B, are limited by their own knowledge base and struggle to autonomously explore complex reasoning paths through reinforcement learning.
This distillation method holds great significance for improving the performance of small models, especially for edge-deployed small models on mobile devices.
However, it’s important to note that even if a small model learns the reasoning patterns of a larger model through distillation, the knowledge it possesses remains what it originally knew. This is why it’s said that the several small distilled models released alongside DeepSeek-R1 are not DeepSeek-R1 itself; although they have learned DeepSeek-R1’s problem-solving methods, their knowledge base still consists of the original Qwen and Llama data.
Therefore, if you’re hoping to achieve the same experience as using the DeepSeek-R1 online service by deploying it locally, I’d advise you to skip the hassle. Not only is the model scale different, but the underlying datasets are also different. The API offers excellent cost-effectiveness and is definitely a better choice for you.
However, if you have specific local deployment scenarios, such as conducting research with security requirements or translating large volumes of text, then you can try deploying these models locally, as their performance in many aspects is superior to the original base models.
[Alright. Below is the local deployment tutorial, explained using Windows; the process for Mac is very similar.]
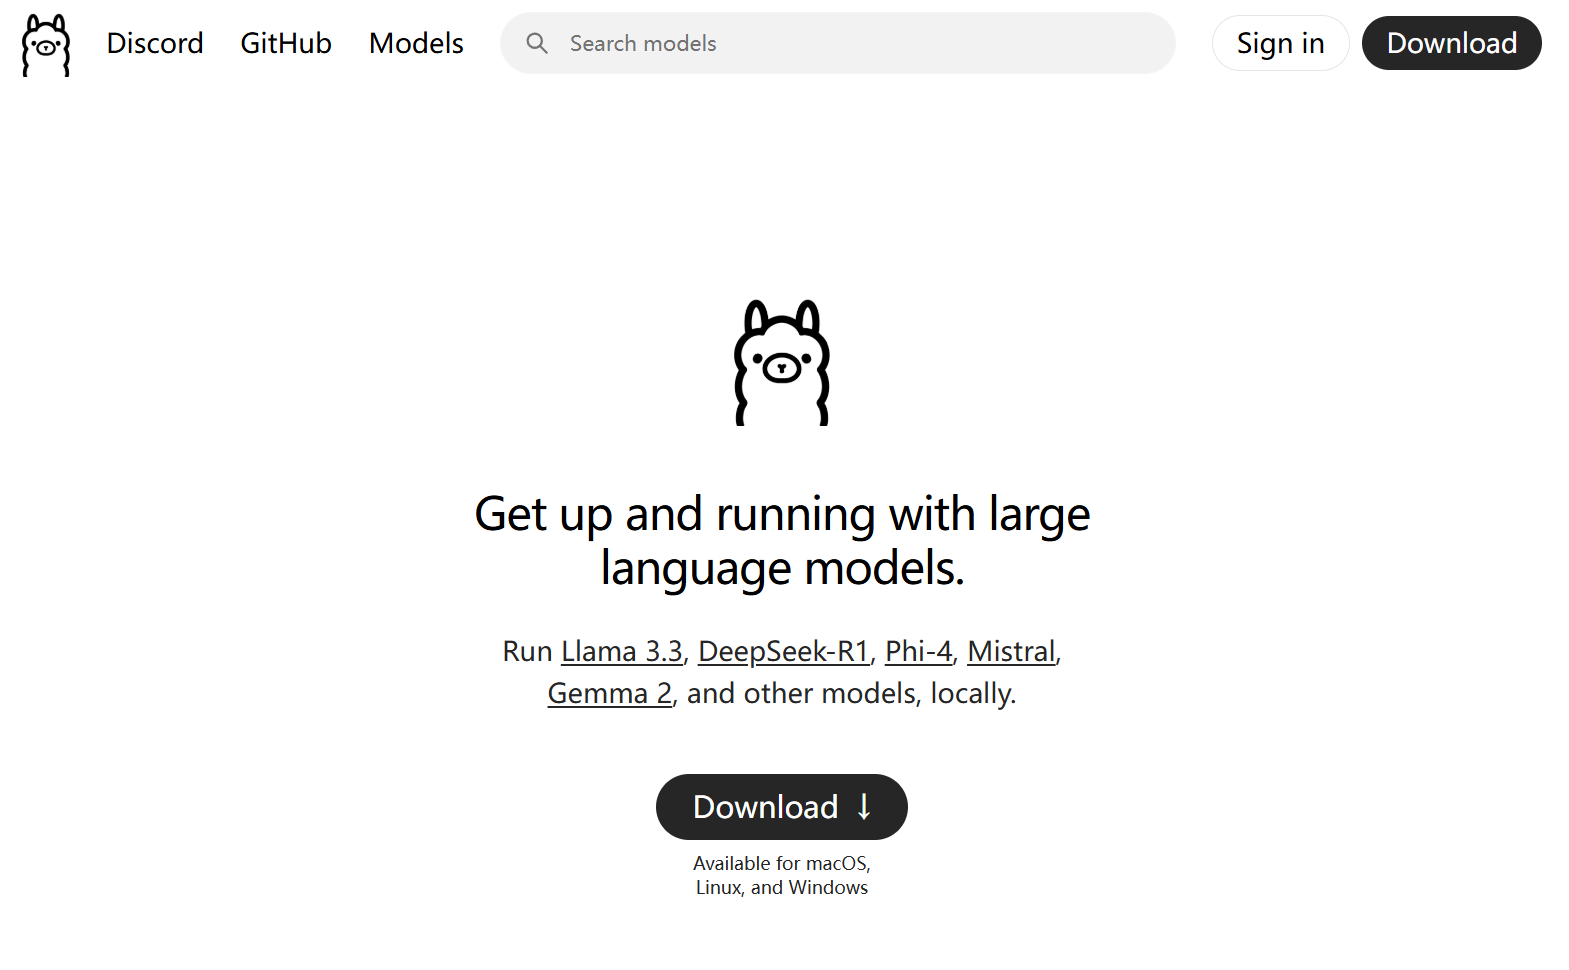
First, download and install Ollama.
https://ollama.com/
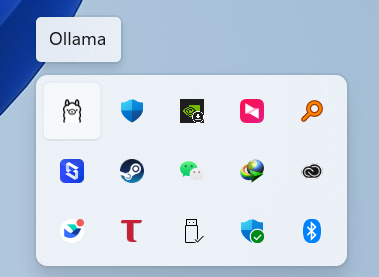
Then run it. After running, there will be no interface window; this is normal.
An Ollama icon will appear in the system tray at the bottom right corner. The presence of this icon indicates that it has started successfully.
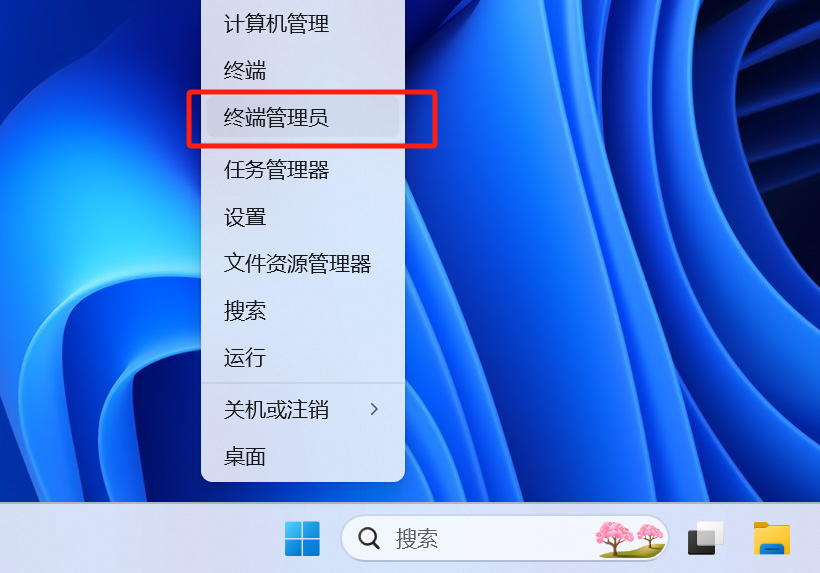
Then right-click the Start menu icon to open the terminal.
Directly enter
ollama run [model you want to deploy:model size]You can find this command directly on the Ollama website, for example, this is the main page for DeepSeek-R1:
https://ollama.com/library/deepseek-r1
Scroll down on this page, and the corresponding commands are all here.

If you want to deploy models other than DeepSeek-R1, it’s the same—you can look them up on this page:
https://ollama.com/search
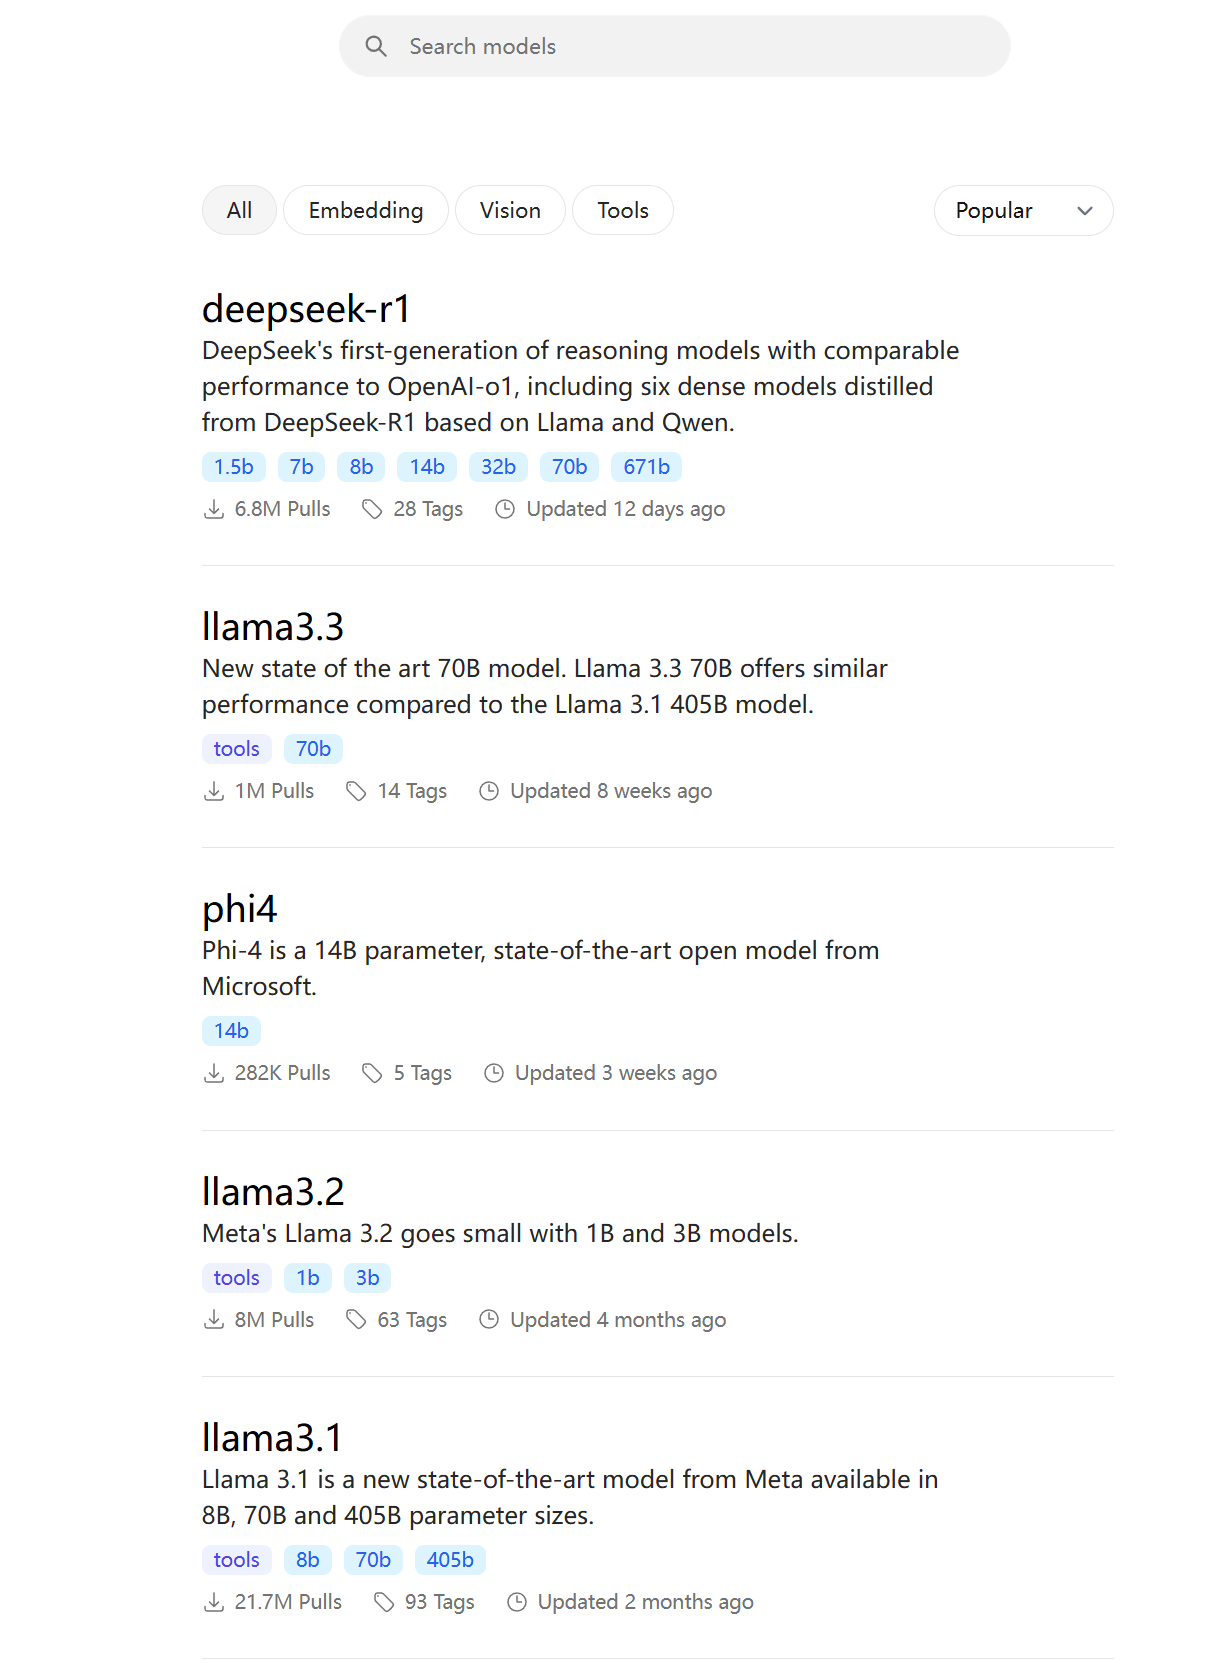
ollama run [model you want to deploy:model scale]
The part with the model you want to deploy is the name shown on this page, and the model scale is the number followed by ‘b’ displayed in the blue tag below.
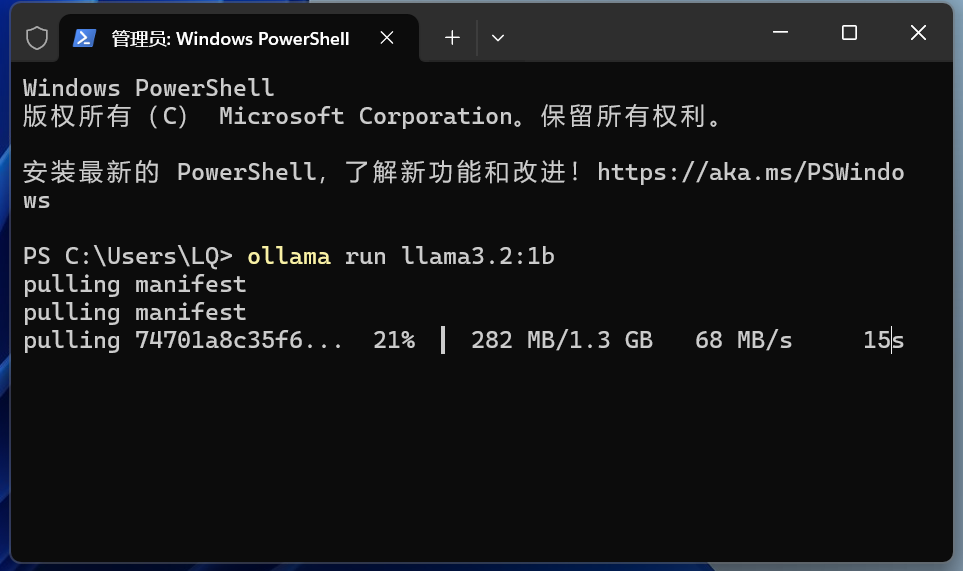
For example, if I want to deploy the 3b version of llama3.2.
Then I would input:
ollama run llama3.2:1b
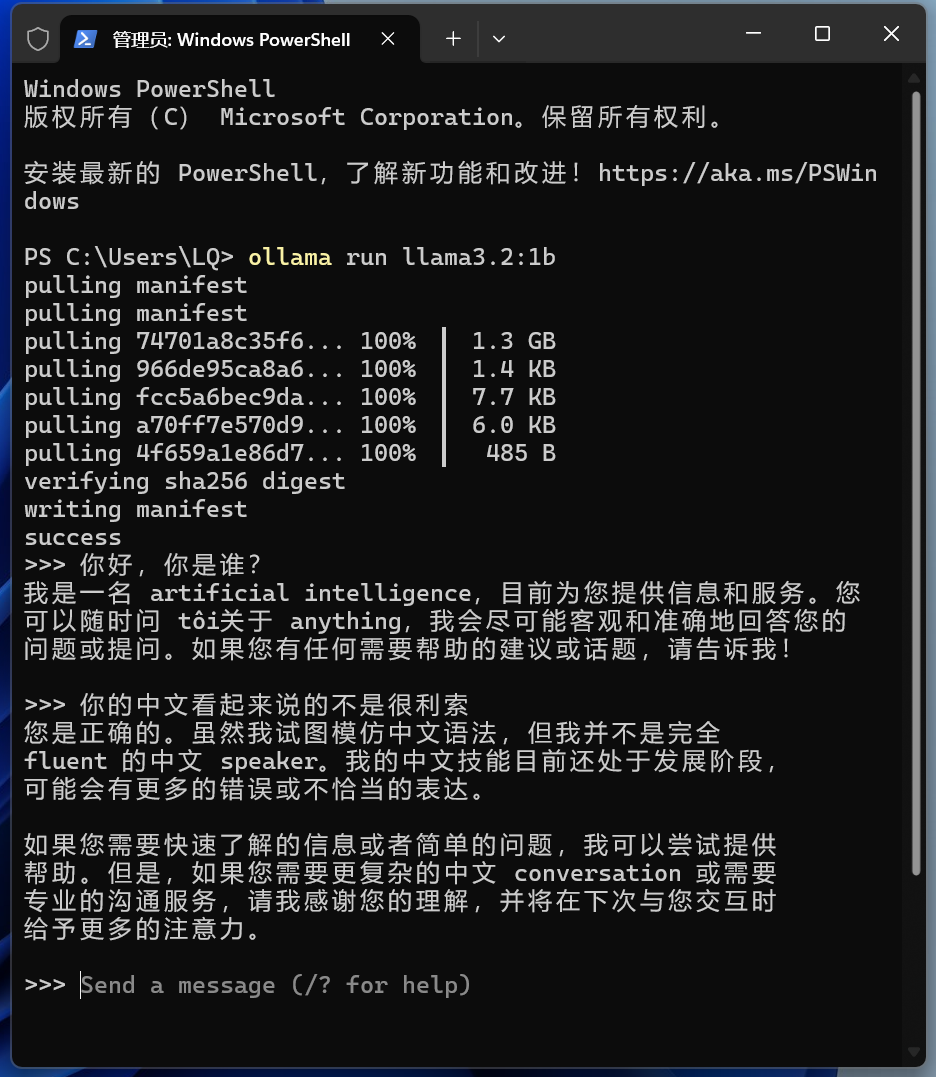
It will start downloading automatically.
Once the download is complete, you can immediately use it in this command line window.
Like this, you can start a conversation directly.
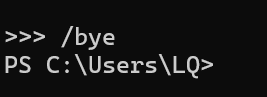
If you need to exit, input
/bye
Then you’ll exit.
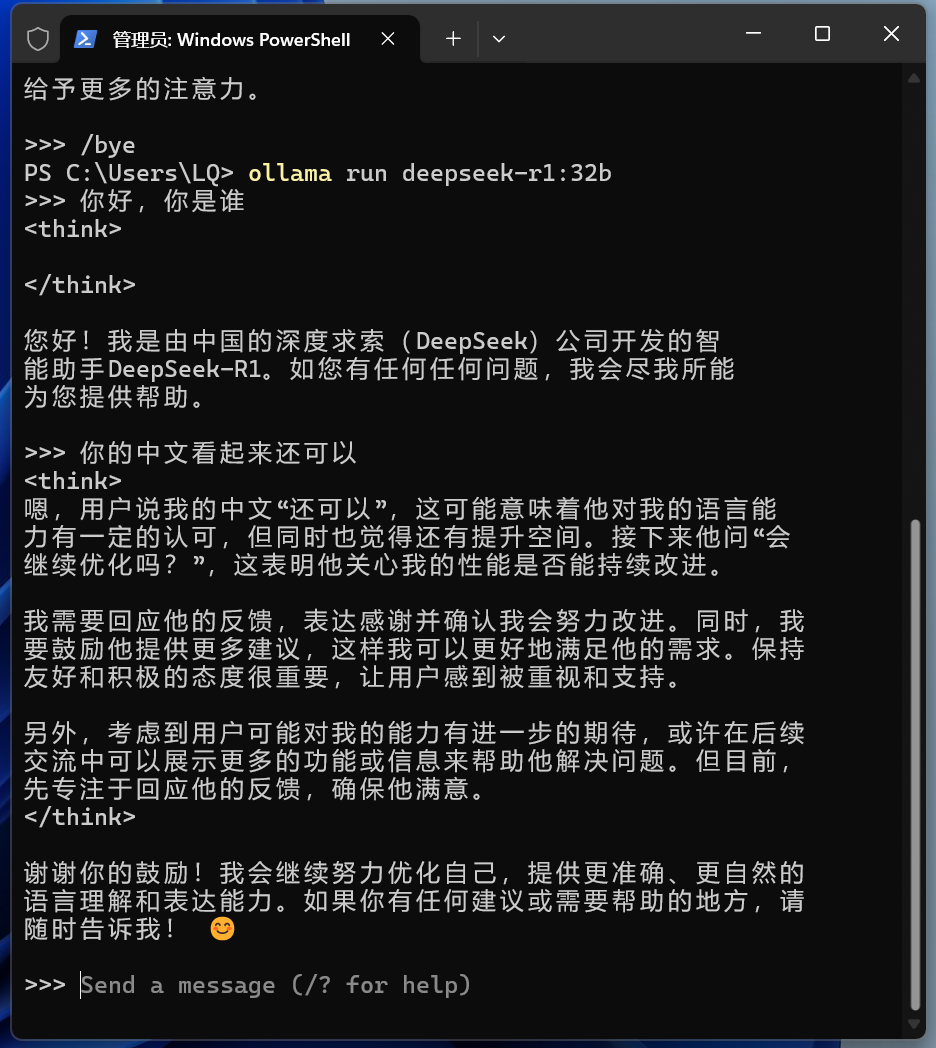
If you want to use it again, input the same command as before. For example:
ollama run deepseek-r1:32b
Let’s break it down first to make it easier to remember.
‘ollama’ is the name of this software, and ‘llama’ is a word that means ‘alpaca’.
‘run’ means to run.
deepseek-r1 is the model name, and 32b refers to the model scale.
Together:
ollama run deepseek-r1:32b
Since it has already been downloaded previously, there won’t be a download process; it will open directly.
However, using it this way is somewhat inelegant, and having an interface would be much better.
Therefore, to make it more elegant, we can install Open-WebUI. The predecessor of Open-WebUI was called Ollama-WebUI, which shows its high compatibility with Ollama.
https://github.com/open-webui/open-webui/pkgs/container/open-webui
Before installing Open-WebUI, you need to configure the Ollama port and install Docker.
Simply search for ‘Environment Variables’ in the Start menu search box and click ‘Edit environment variables for your account’.
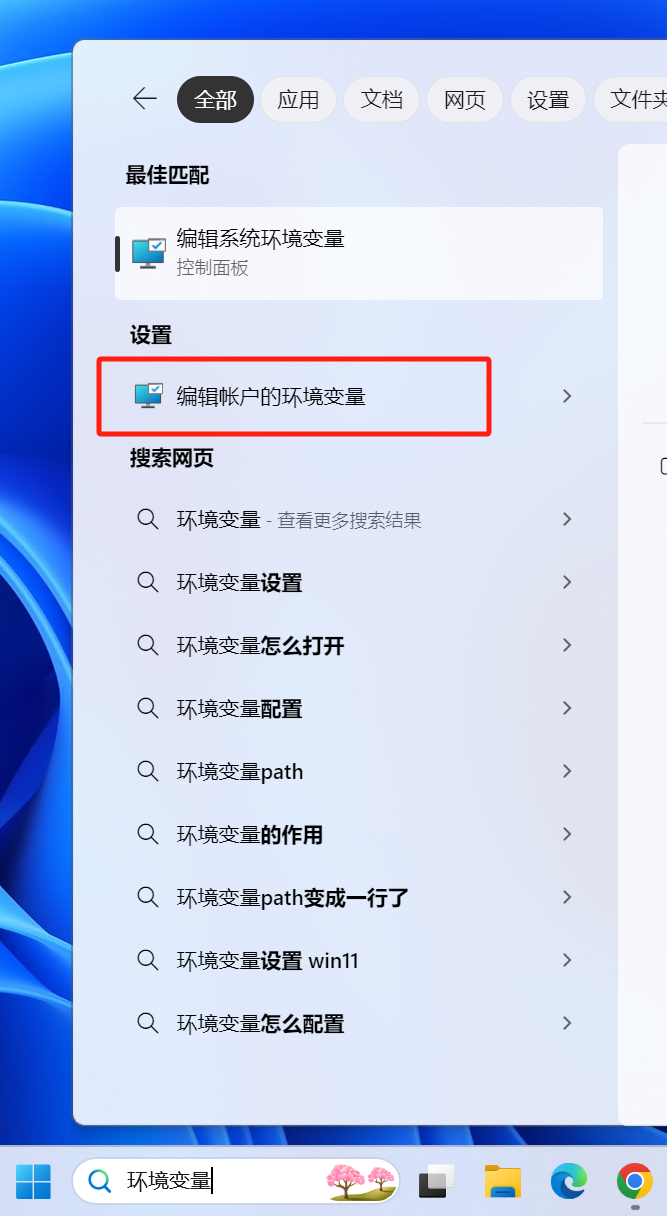
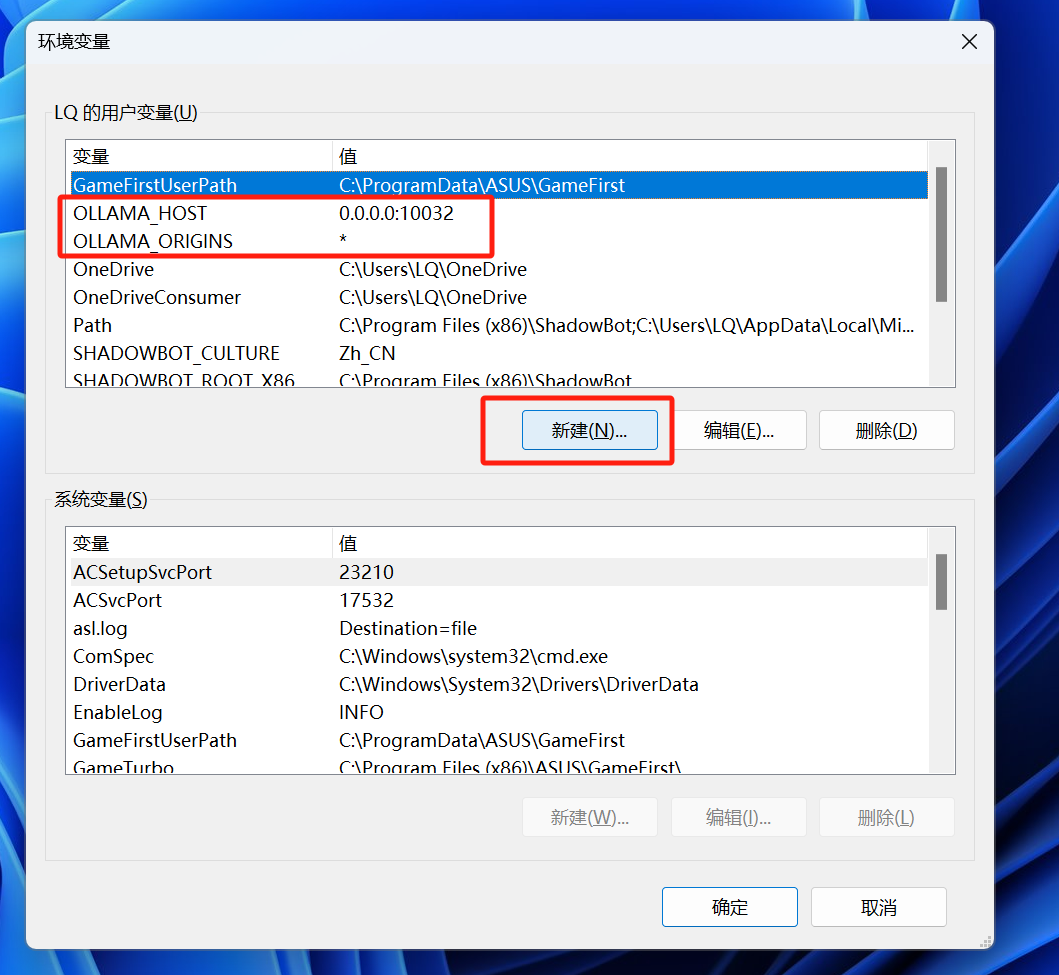
Create two new environment variables.
One is OLLAMA_ORIGINS, with the value *;
The other is OLLAMA_HOST, with the value 0.0.0.0:11434.
The official default port number is 11434, but I changed it to my preferred port. If you plan to deploy other things later, such as browser extensions, translation plugins, or SillyTavern, and worry that you might forget the custom port you set here, just use 11434.
The process of installing Docker is straightforward, and there are plenty of tutorials online. To save space, I won’t elaborate here.
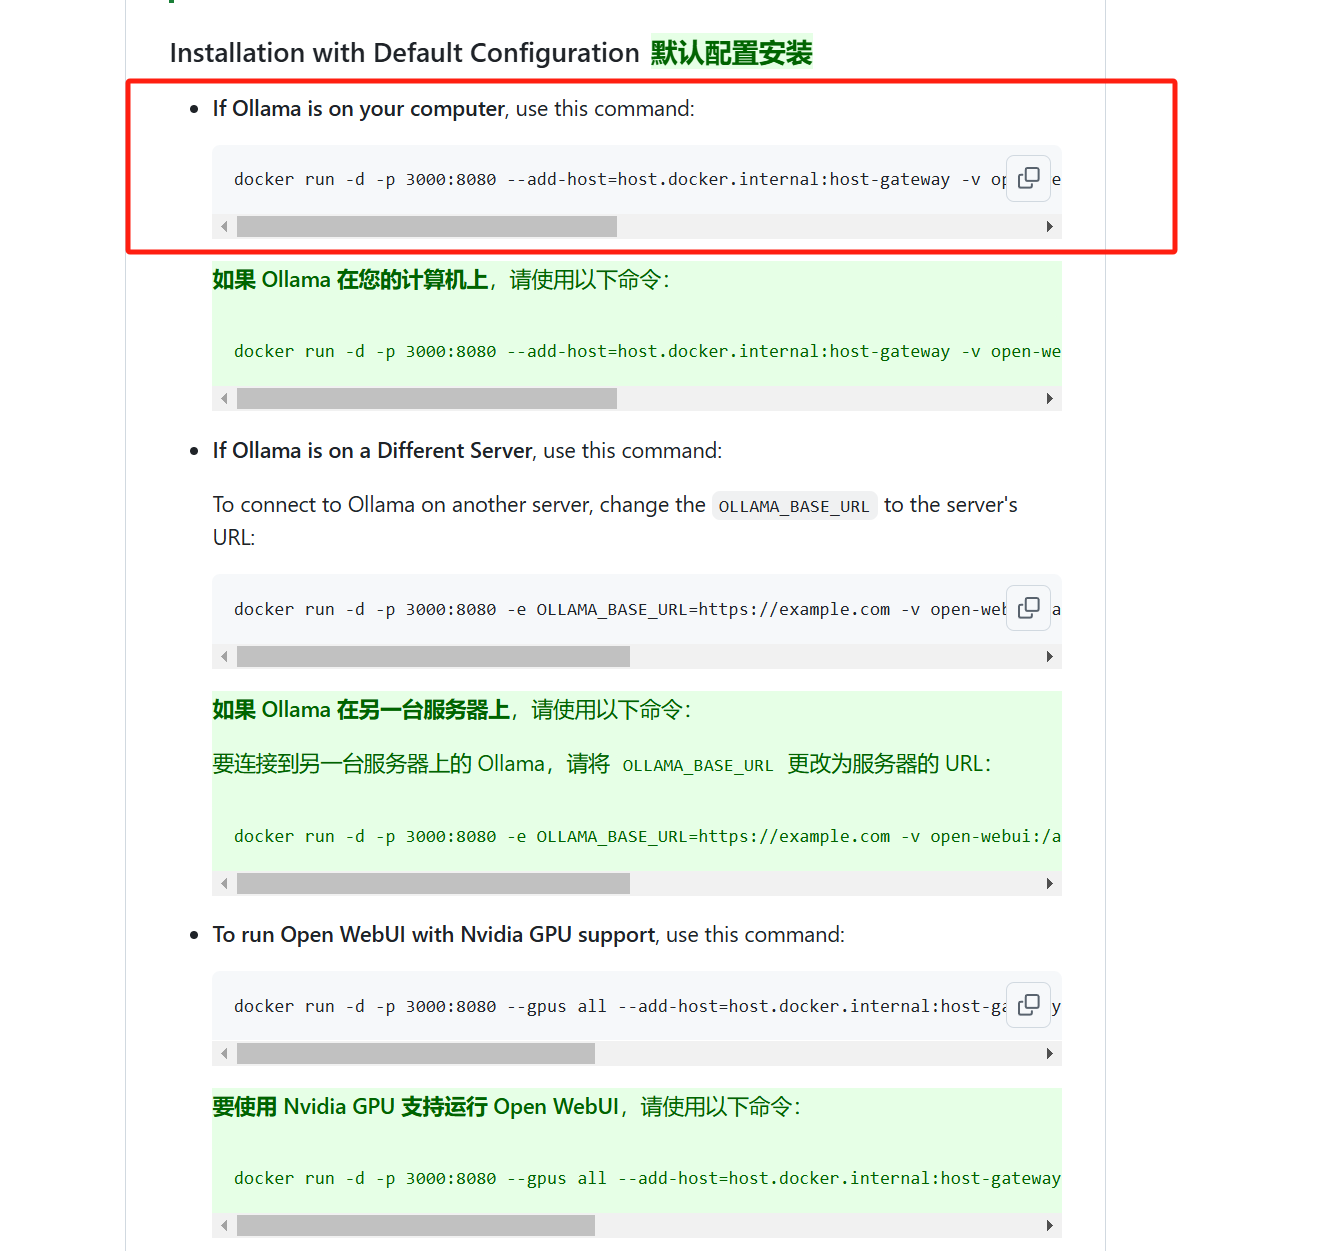
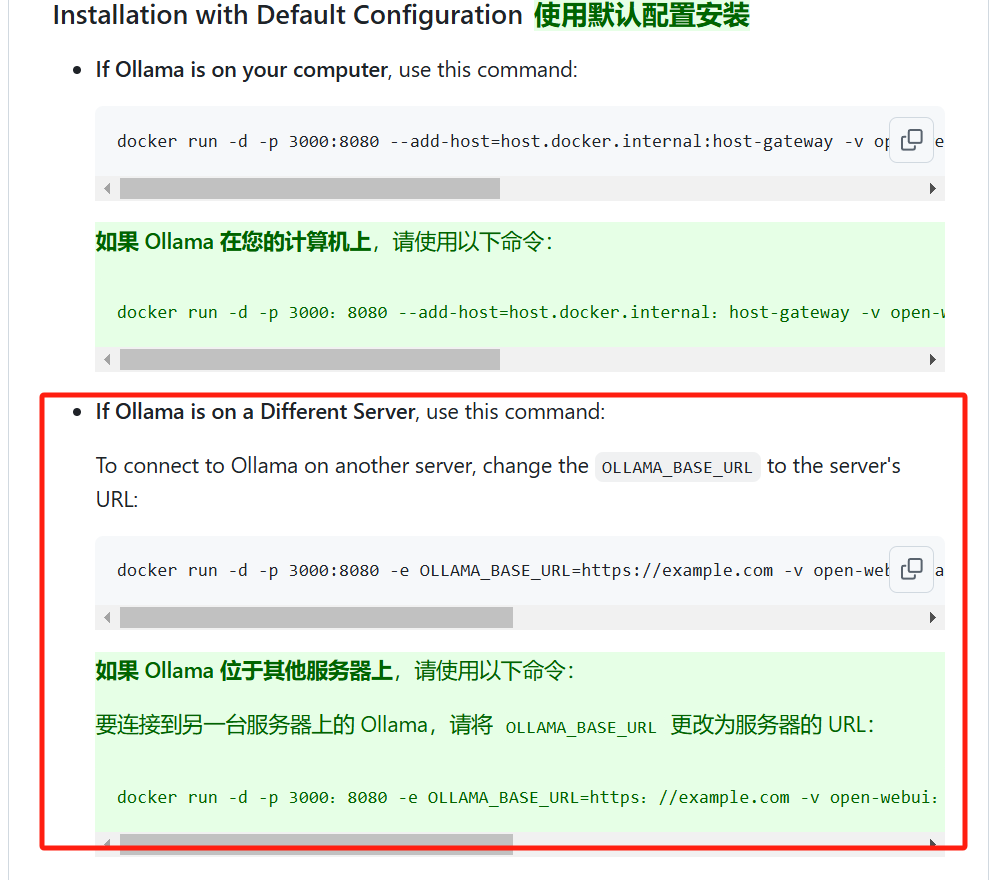
If you are installing locally, run this command in Docker.
docker run -d -p 3000:8080 --add-host=host.docker.internal:host-gateway -v open-webui:/app/backend/data --name open-webui --restart always ghcr.io/open-webui/open-webui:main
The -p 3000:8080 part means that the local port you are using is 3000, and this port number can be changed.
Since many applications like to set the default port to 3000, there might be port conflicts. If your port 3000 is already in use, change it to another number, such as 3001. Then, when accessing the WebUI, just replace the port number in the URL with 3001.
Personally, I prefer to deploy all Docker containers on my NAS for easy reverse proxying, so I’ll also mention the method for non-local installations.
If you have deployed WebUI locally on your machine as well, you can skip the following section.
It actually refers to the second point below:
docker run -d -p 3000:8080 -e OLLAMA_BASE_URL=https://example.com -v open-webui:/app/backend/data --name open-webui --restart always ghcr.io/open-webui/open-webui:main
You need to add an additional environment variable OLLAMA_BASE_URL.
What does this mean? We know that two devices in a local network will be assigned two different internal IP addresses by the router; otherwise, the router wouldn’t know which data packet to send to which device.
Suppose my PC’s internal IP is 192.168.1.101, and the NAS’s internal IP is 192.168.1.102. Following the previous method of deploying WebUI locally, both WebUI and Ollama are on the device at 192.168.1.101, so WebUI can directly find port 11434 to exchange data with Ollama.
However, if WebUI is on 192.168.1.102 and Ollama is on 192.168.1.101, you need to tell it to go to 192.168.1.101:11434 to find it; otherwise, it will foolishly keep looking on 192.168.1.102 and never find it.
So the operation method is to replace
OLLAMA_BASE_URL=https://example.com
the ‘https://example.com’ in the command above with the actual address, for example,
http://192.168.1.101:11434
This way, it can be found.
What if you’re using a NAS device like Zspace that doesn’t support SSH? How should you proceed? Don’t worry, make good use of AI.
Simply send the command to AI for it to explain.
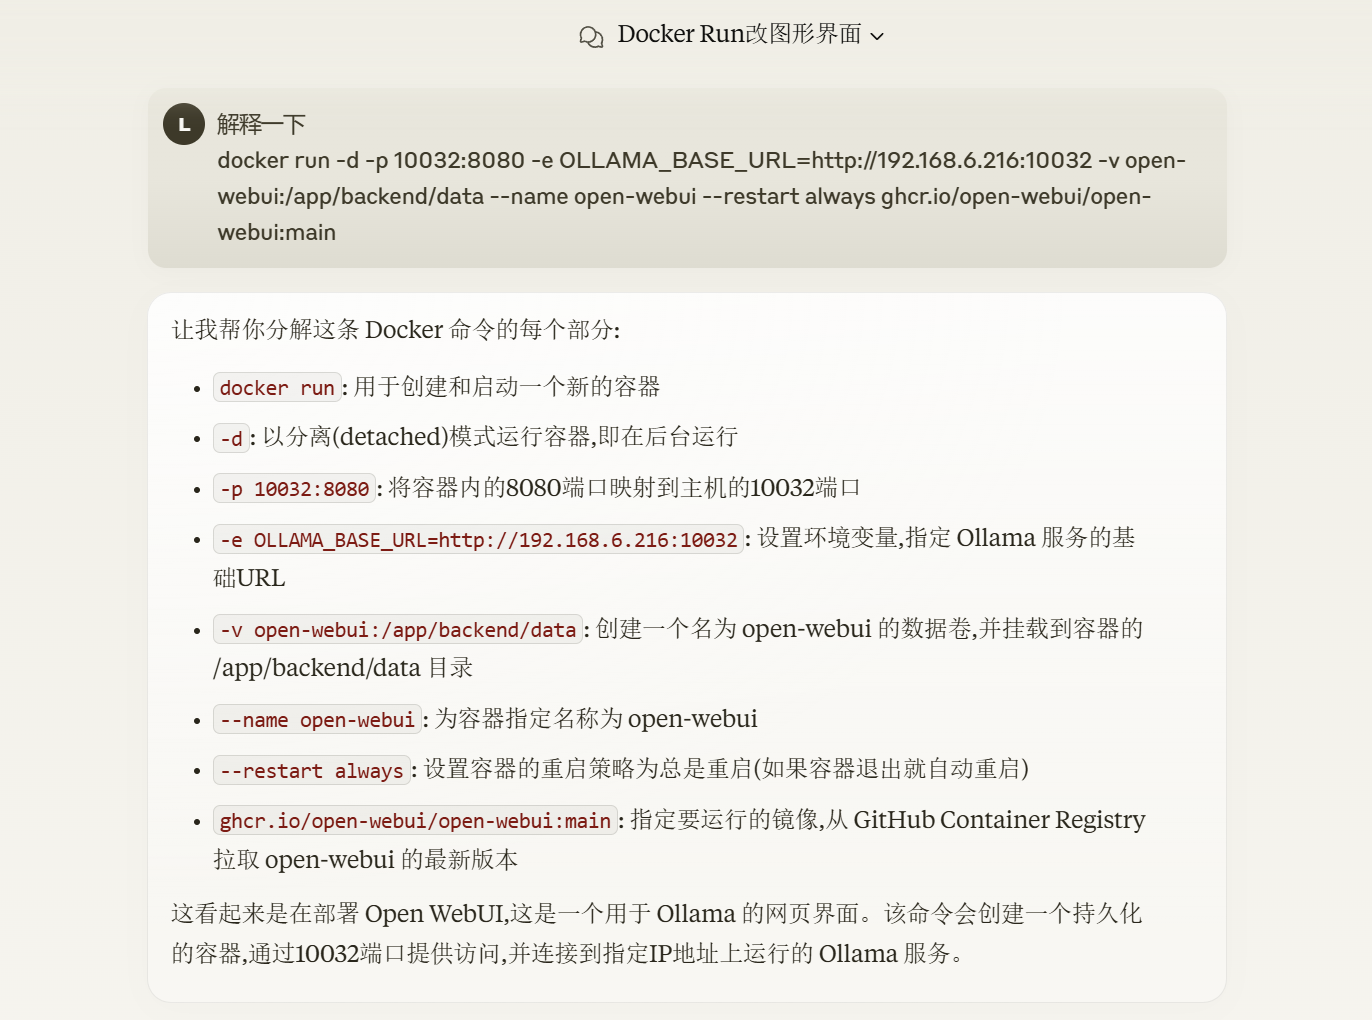
You can even take a screenshot and throw it directly to AI to tell you how to operate.
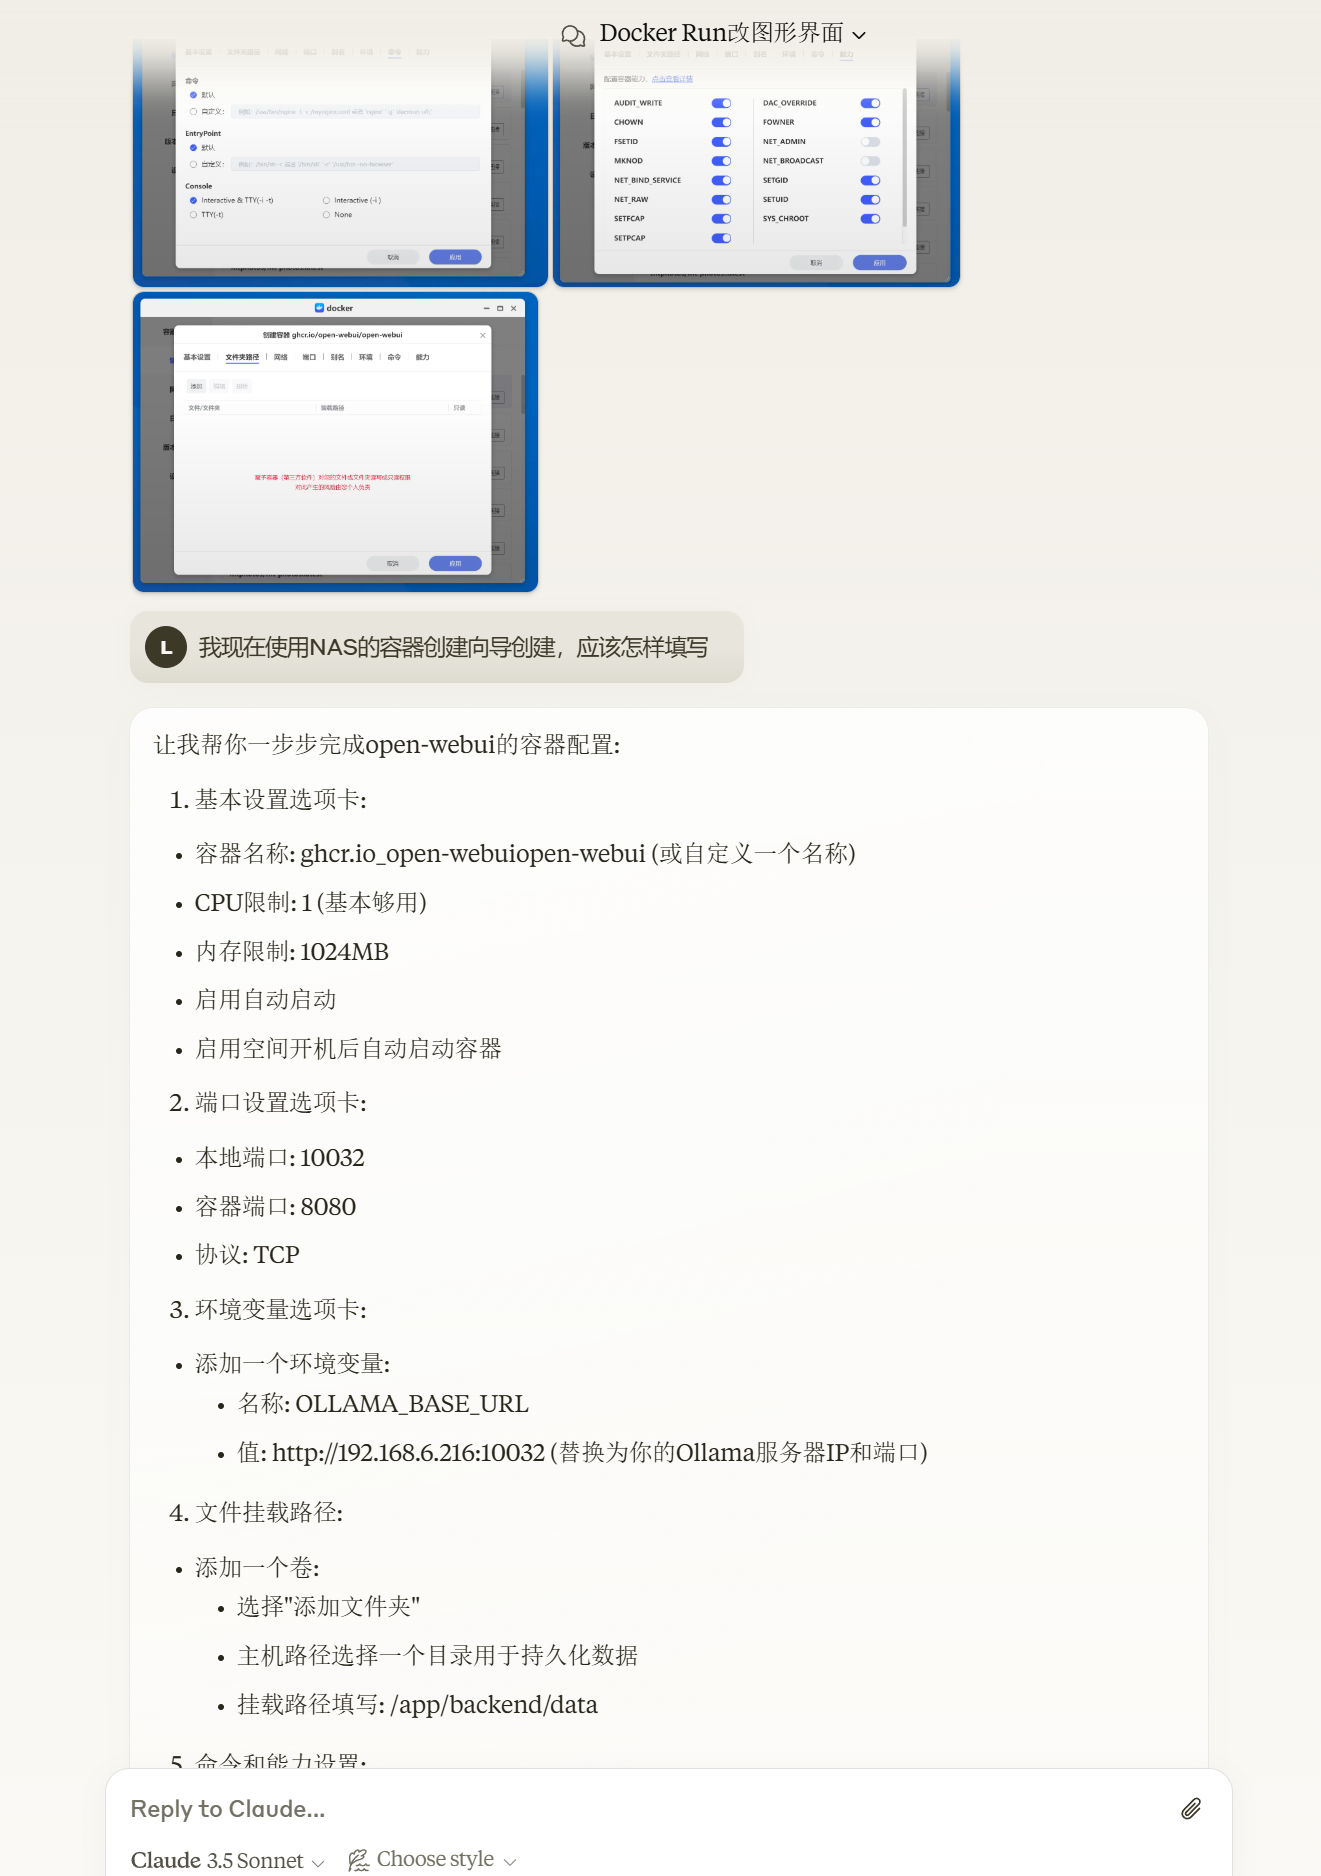
For every tab and every space, AI will directly tell you how to fill them in.
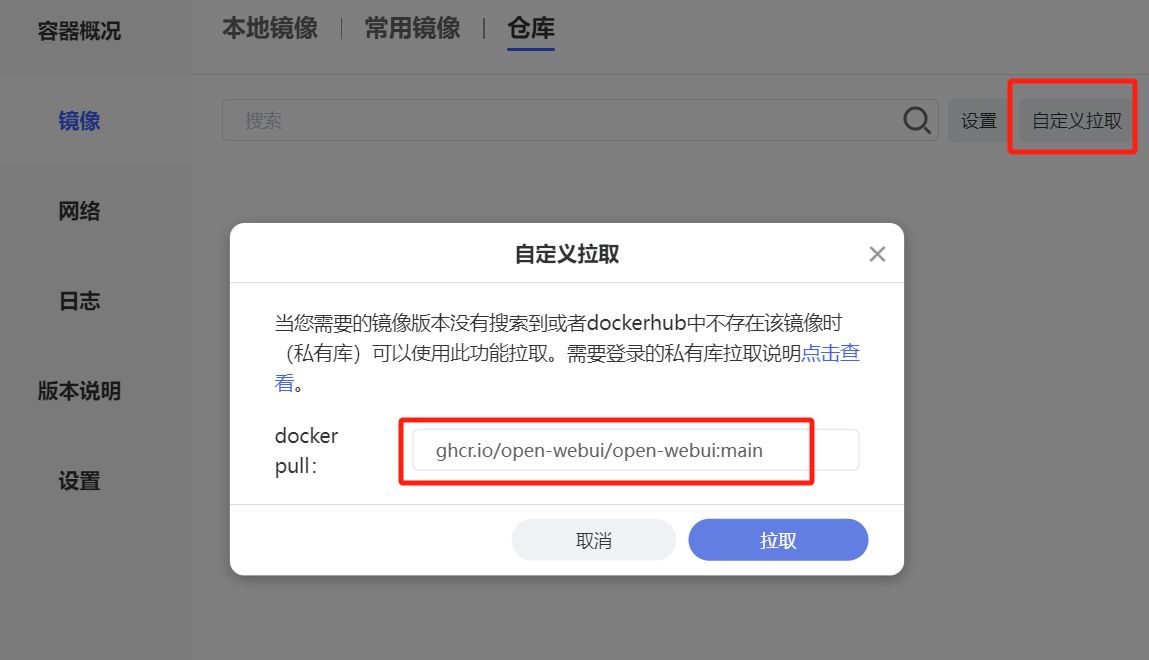
Zspace pulls images from GitHub here:
Other steps are as shown in the AI dialogue screenshot.
[Okay, if you jumped here from the local deployment section above, you can land here.]
After the Docker startup for Open-WebUI is complete (it may take some time to start), you can directly enter the IP address plus port number in the browser’s address bar (if Docker is installed locally, use the local one; if it’s on a NAS, fill in the NAS’s) to access Open-WebUI.
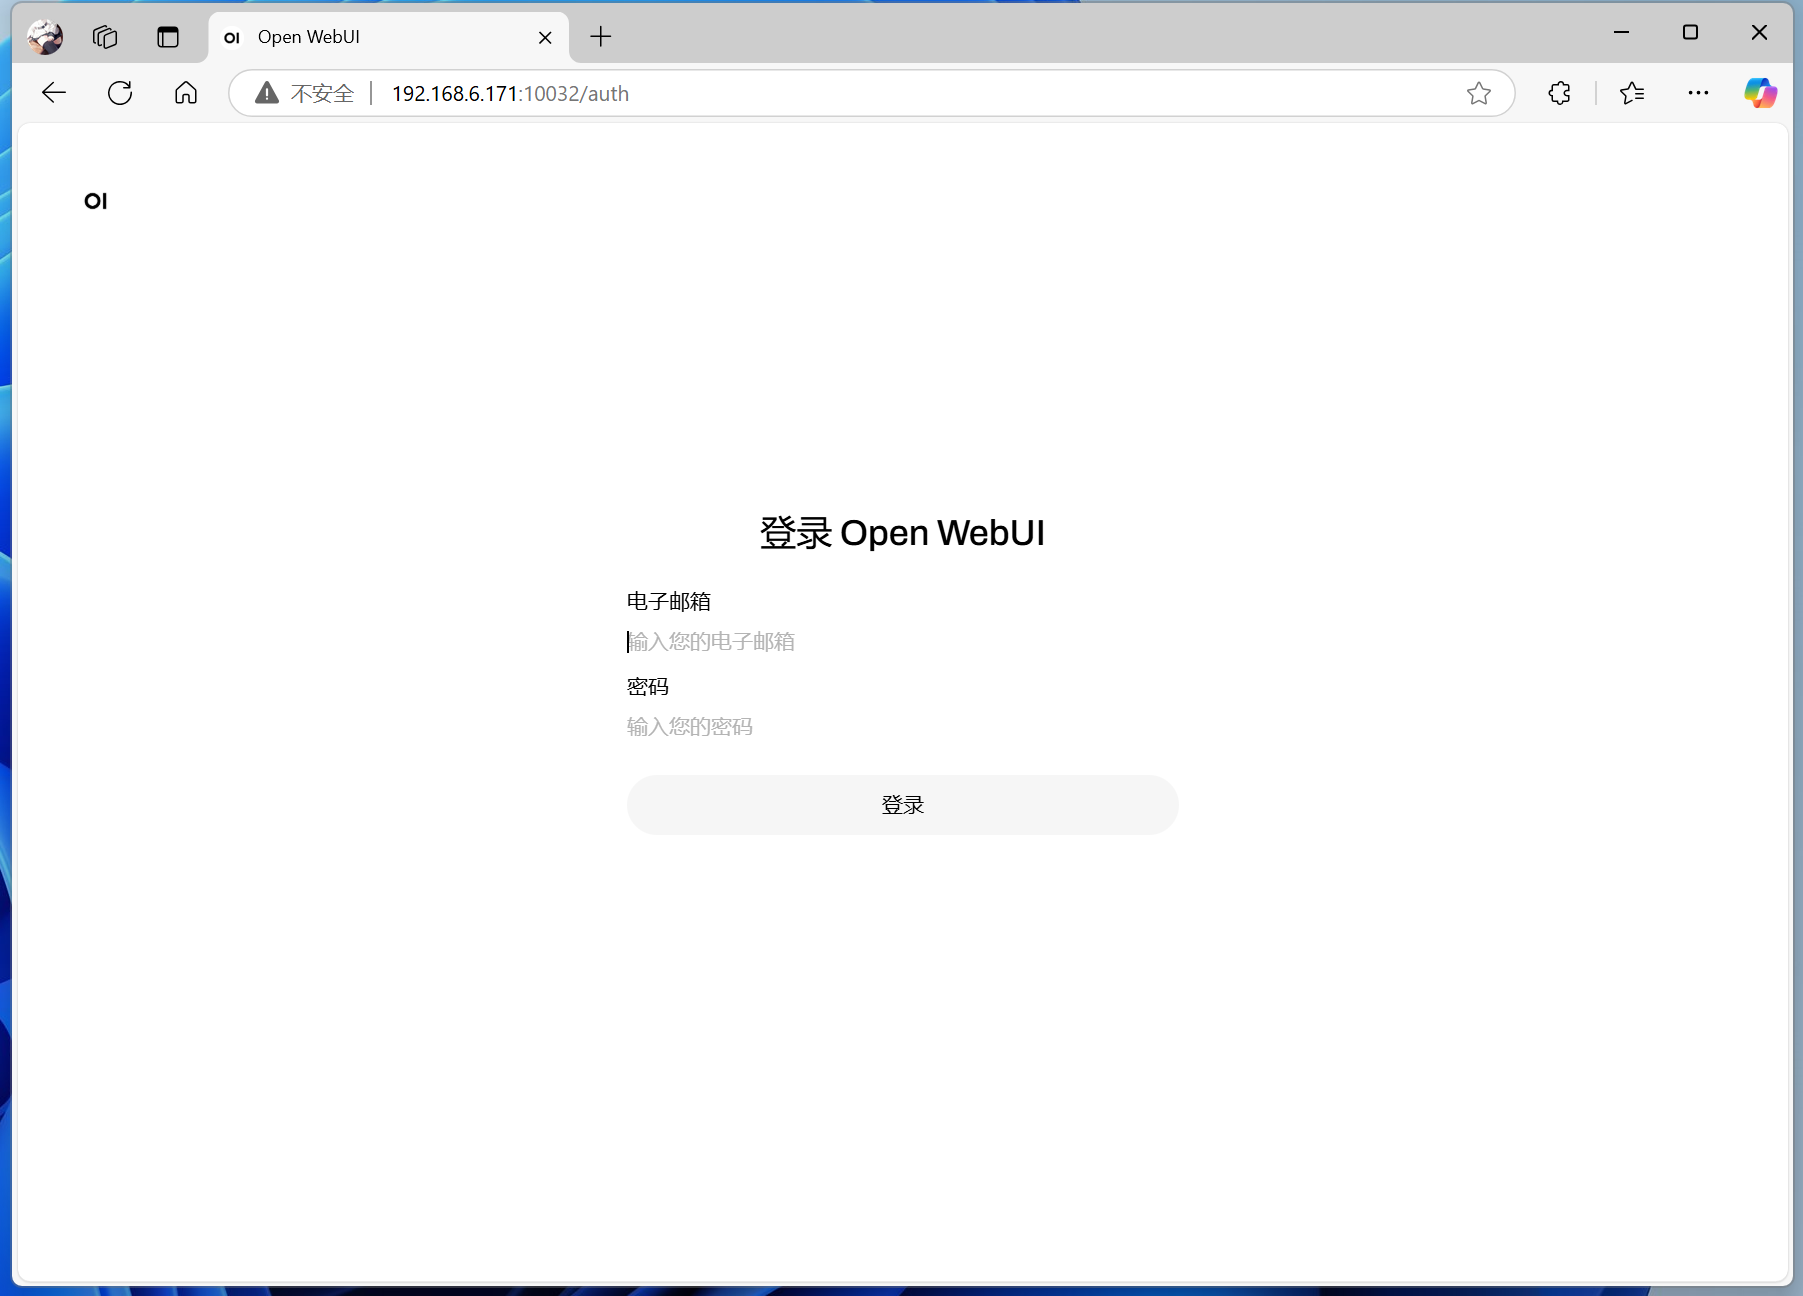
If it’s your first time installing, you need to register first.
Note that this registration is not for an Ollama account, but for Open-WebUI’s built-in account management system locally. You can register an account for yourself, one for your spouse, and one for your child. When the three of you access it on the home local network, the account data remains independent.
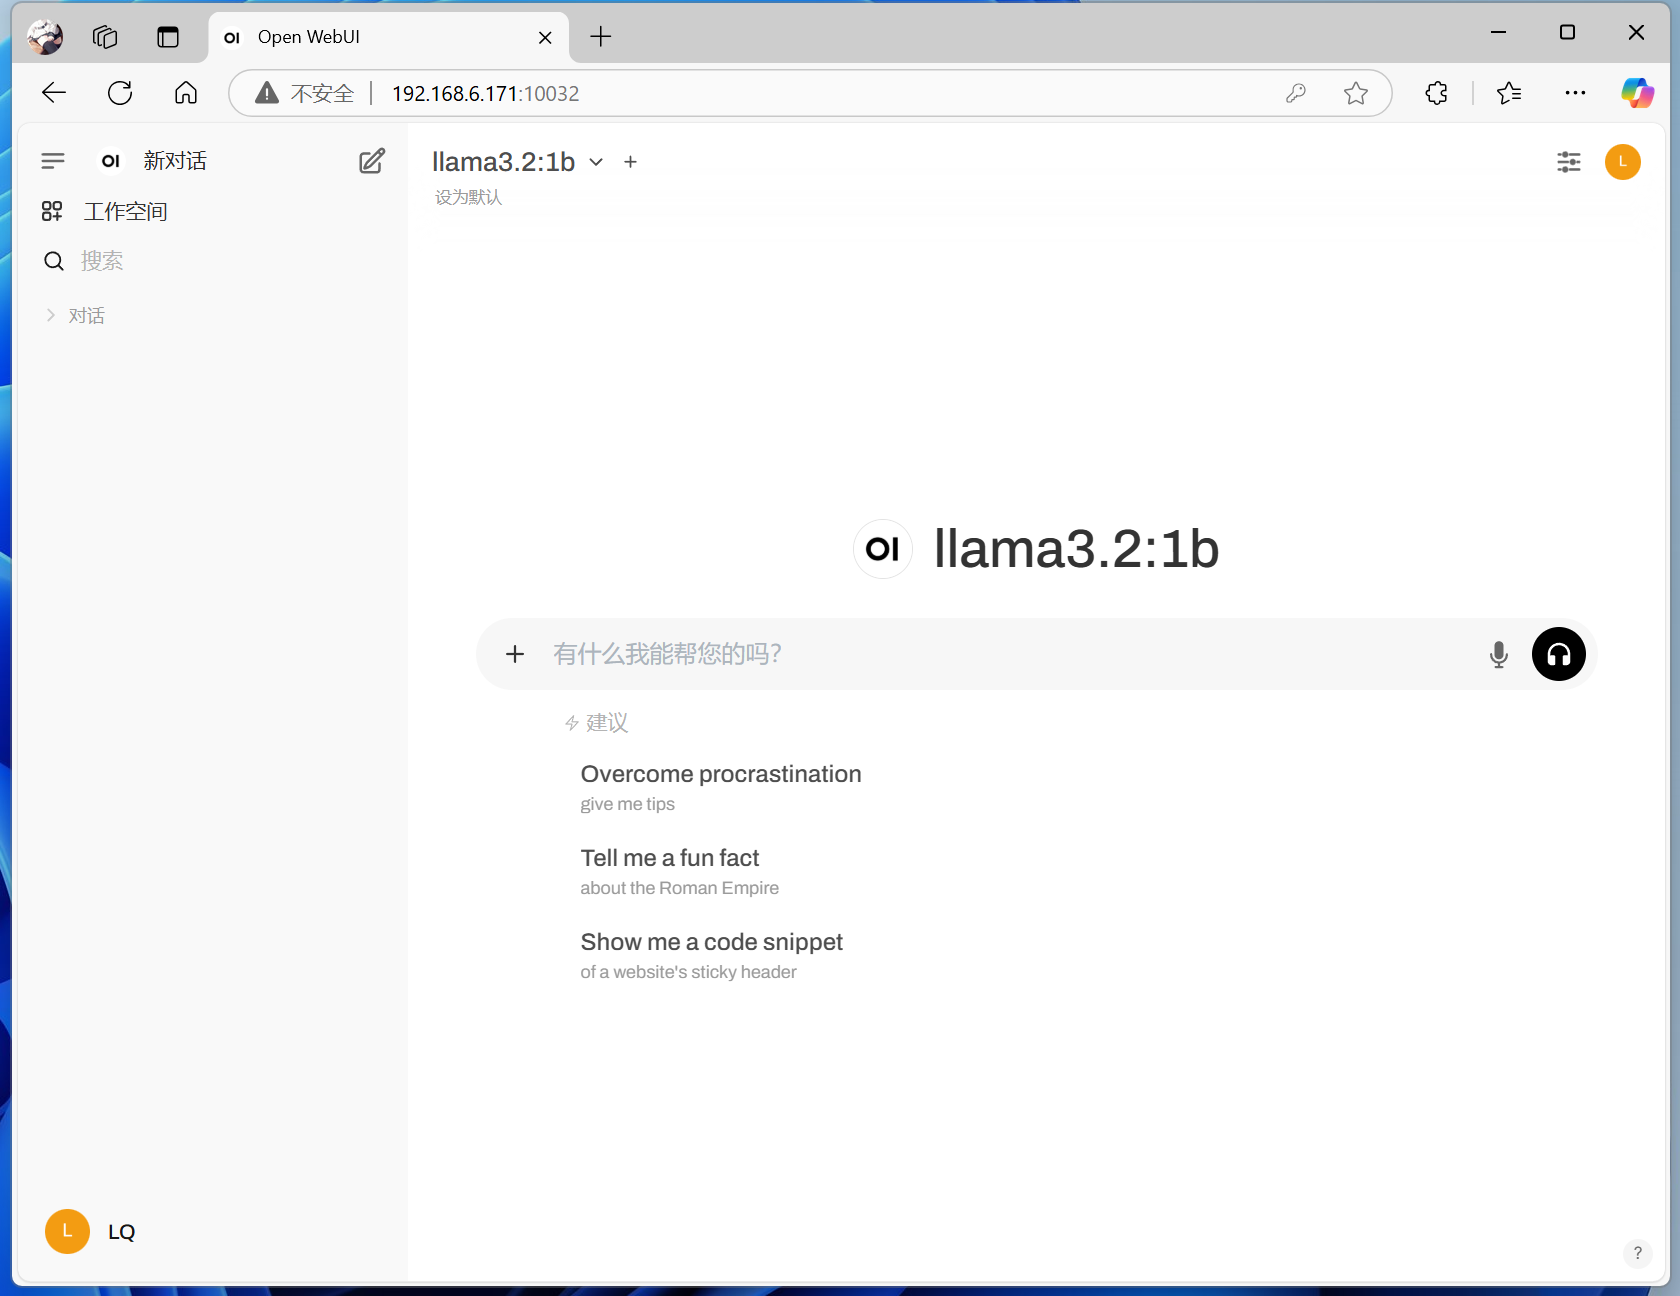
After logging in, you can enter the chat interface.
For example, what’s displayed here is the llama:1b model I just downloaded, which isn’t very fluent in Chinese.
If you can log in but the page appears blank after logging in.
Don’t worry, it’s likely that you forgot to start Ollama, or you started Ollama but forgot to run a model.
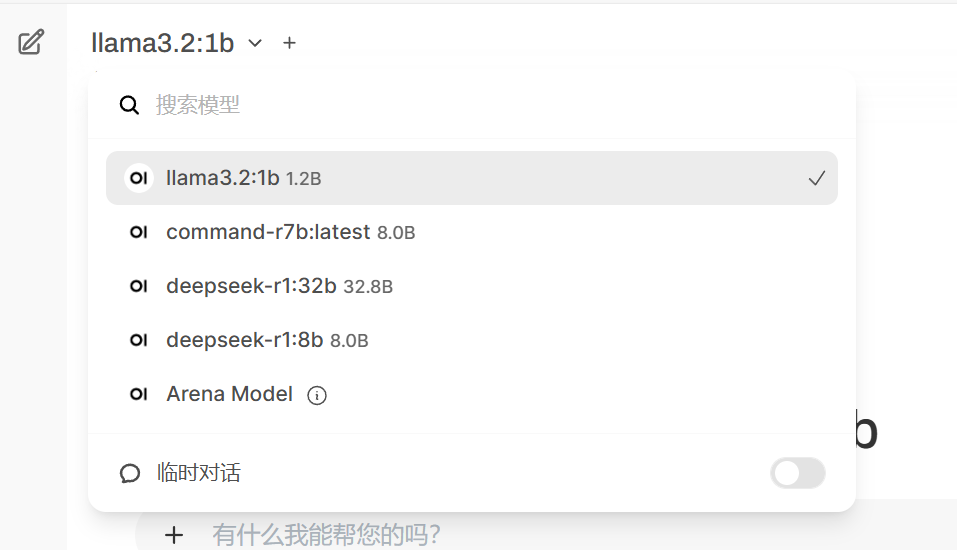
With Open-WebUI, you don’t have to say ‘bye’ and then run a new model each time in the command line window to chat with different AI models. You can switch directly through the menu.
Your conversation history will be saved in Open-WebUI, just like using an online AI assistant.
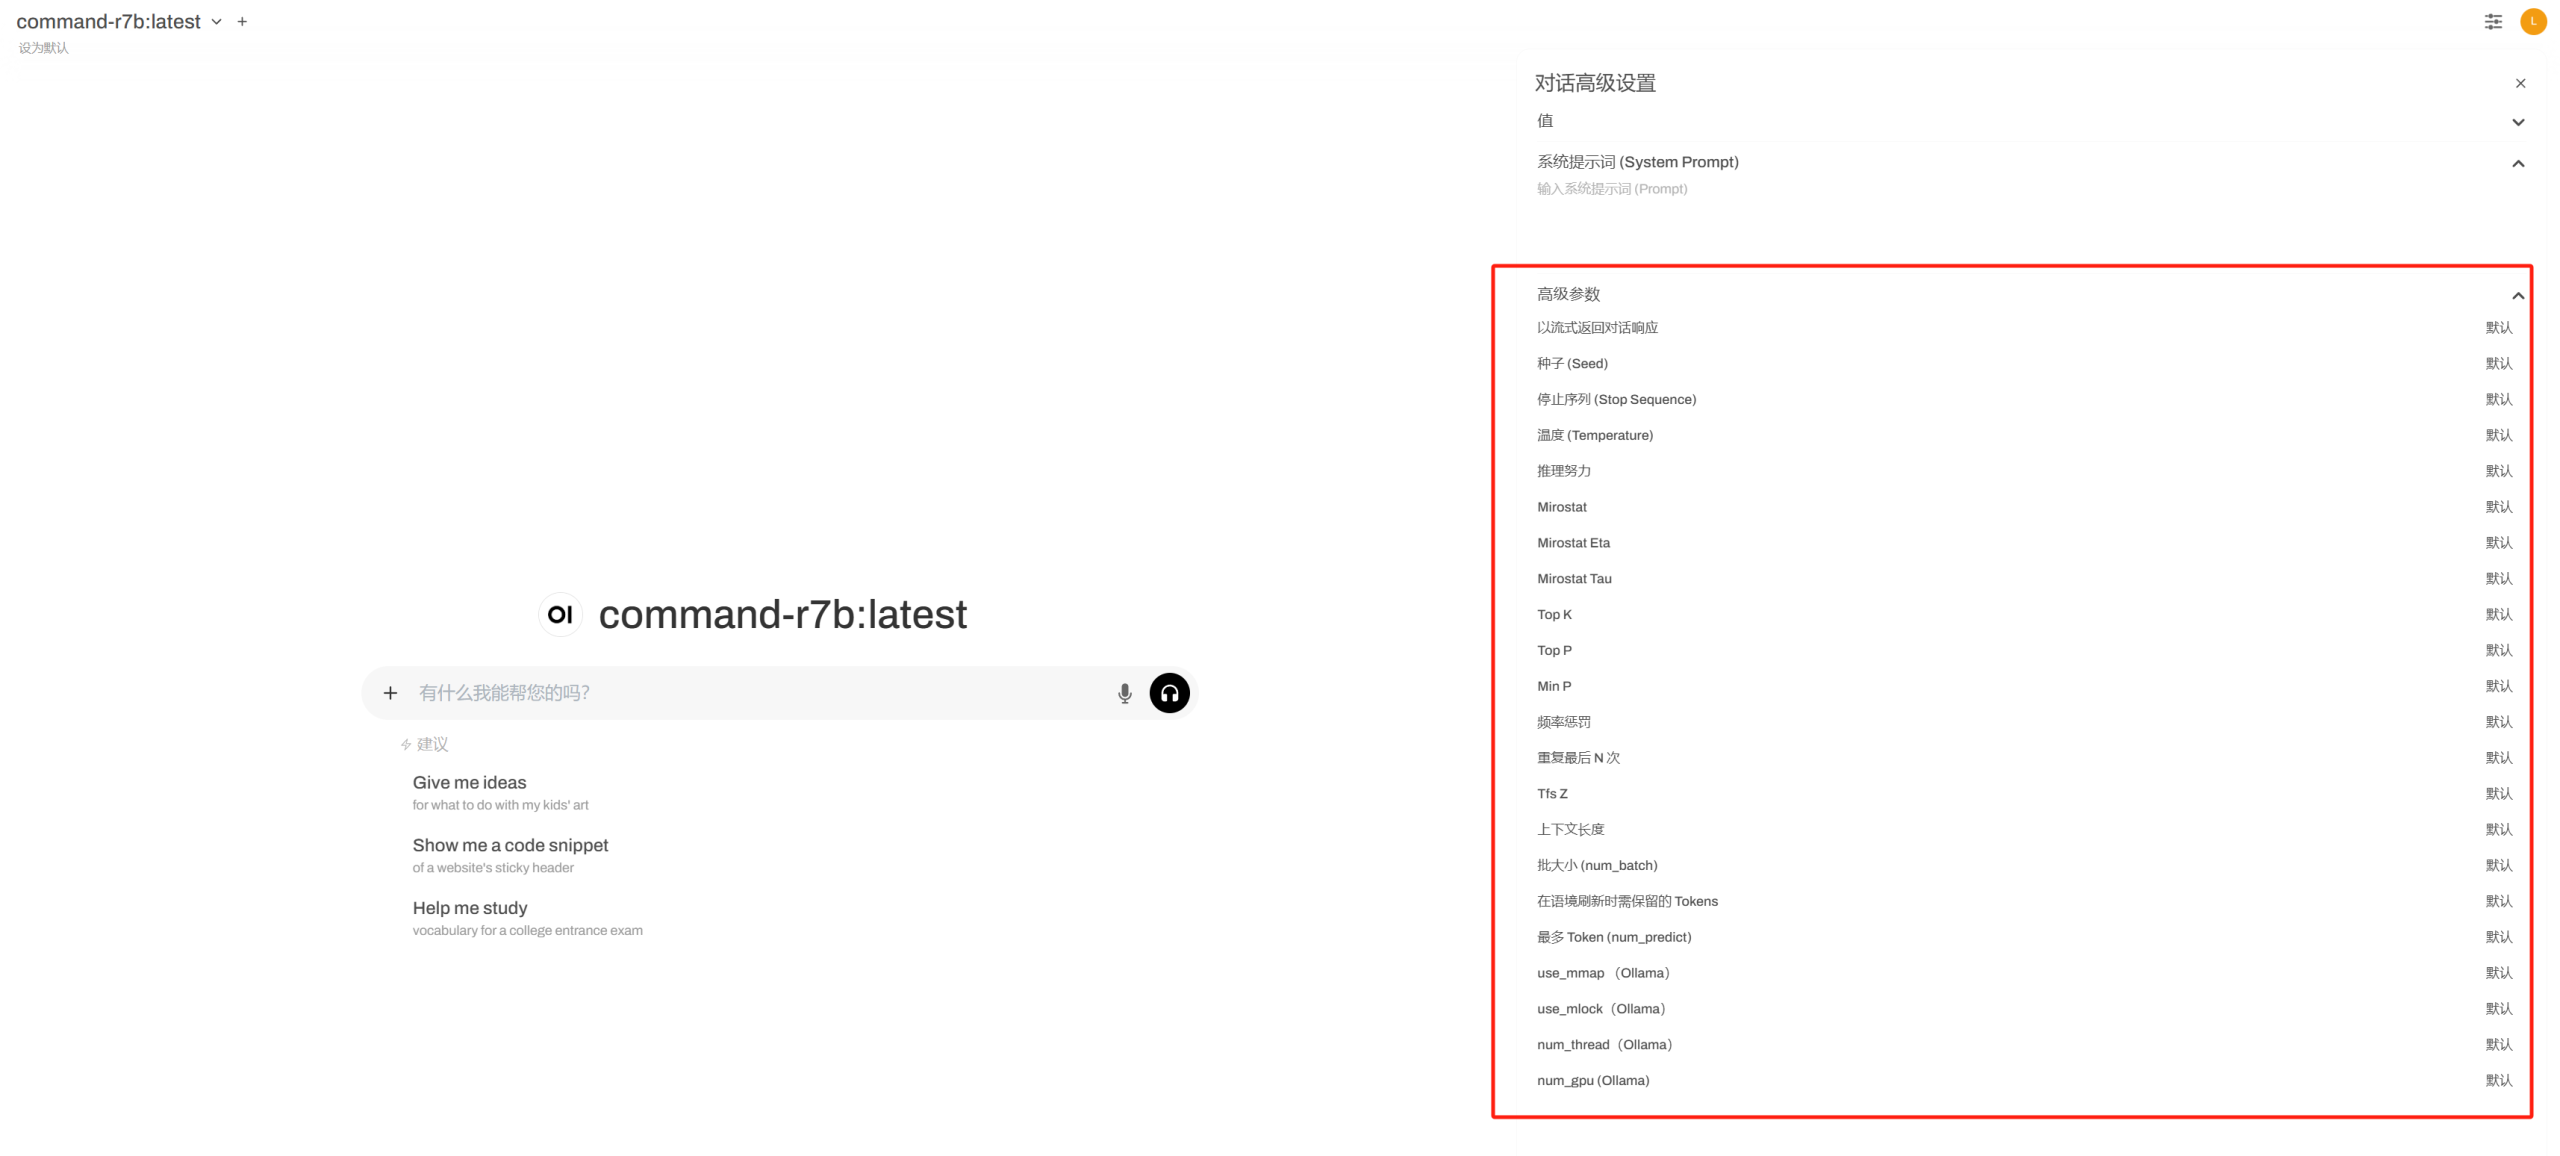
At the same time, you can set system prompts and detailed parameters through the interface.
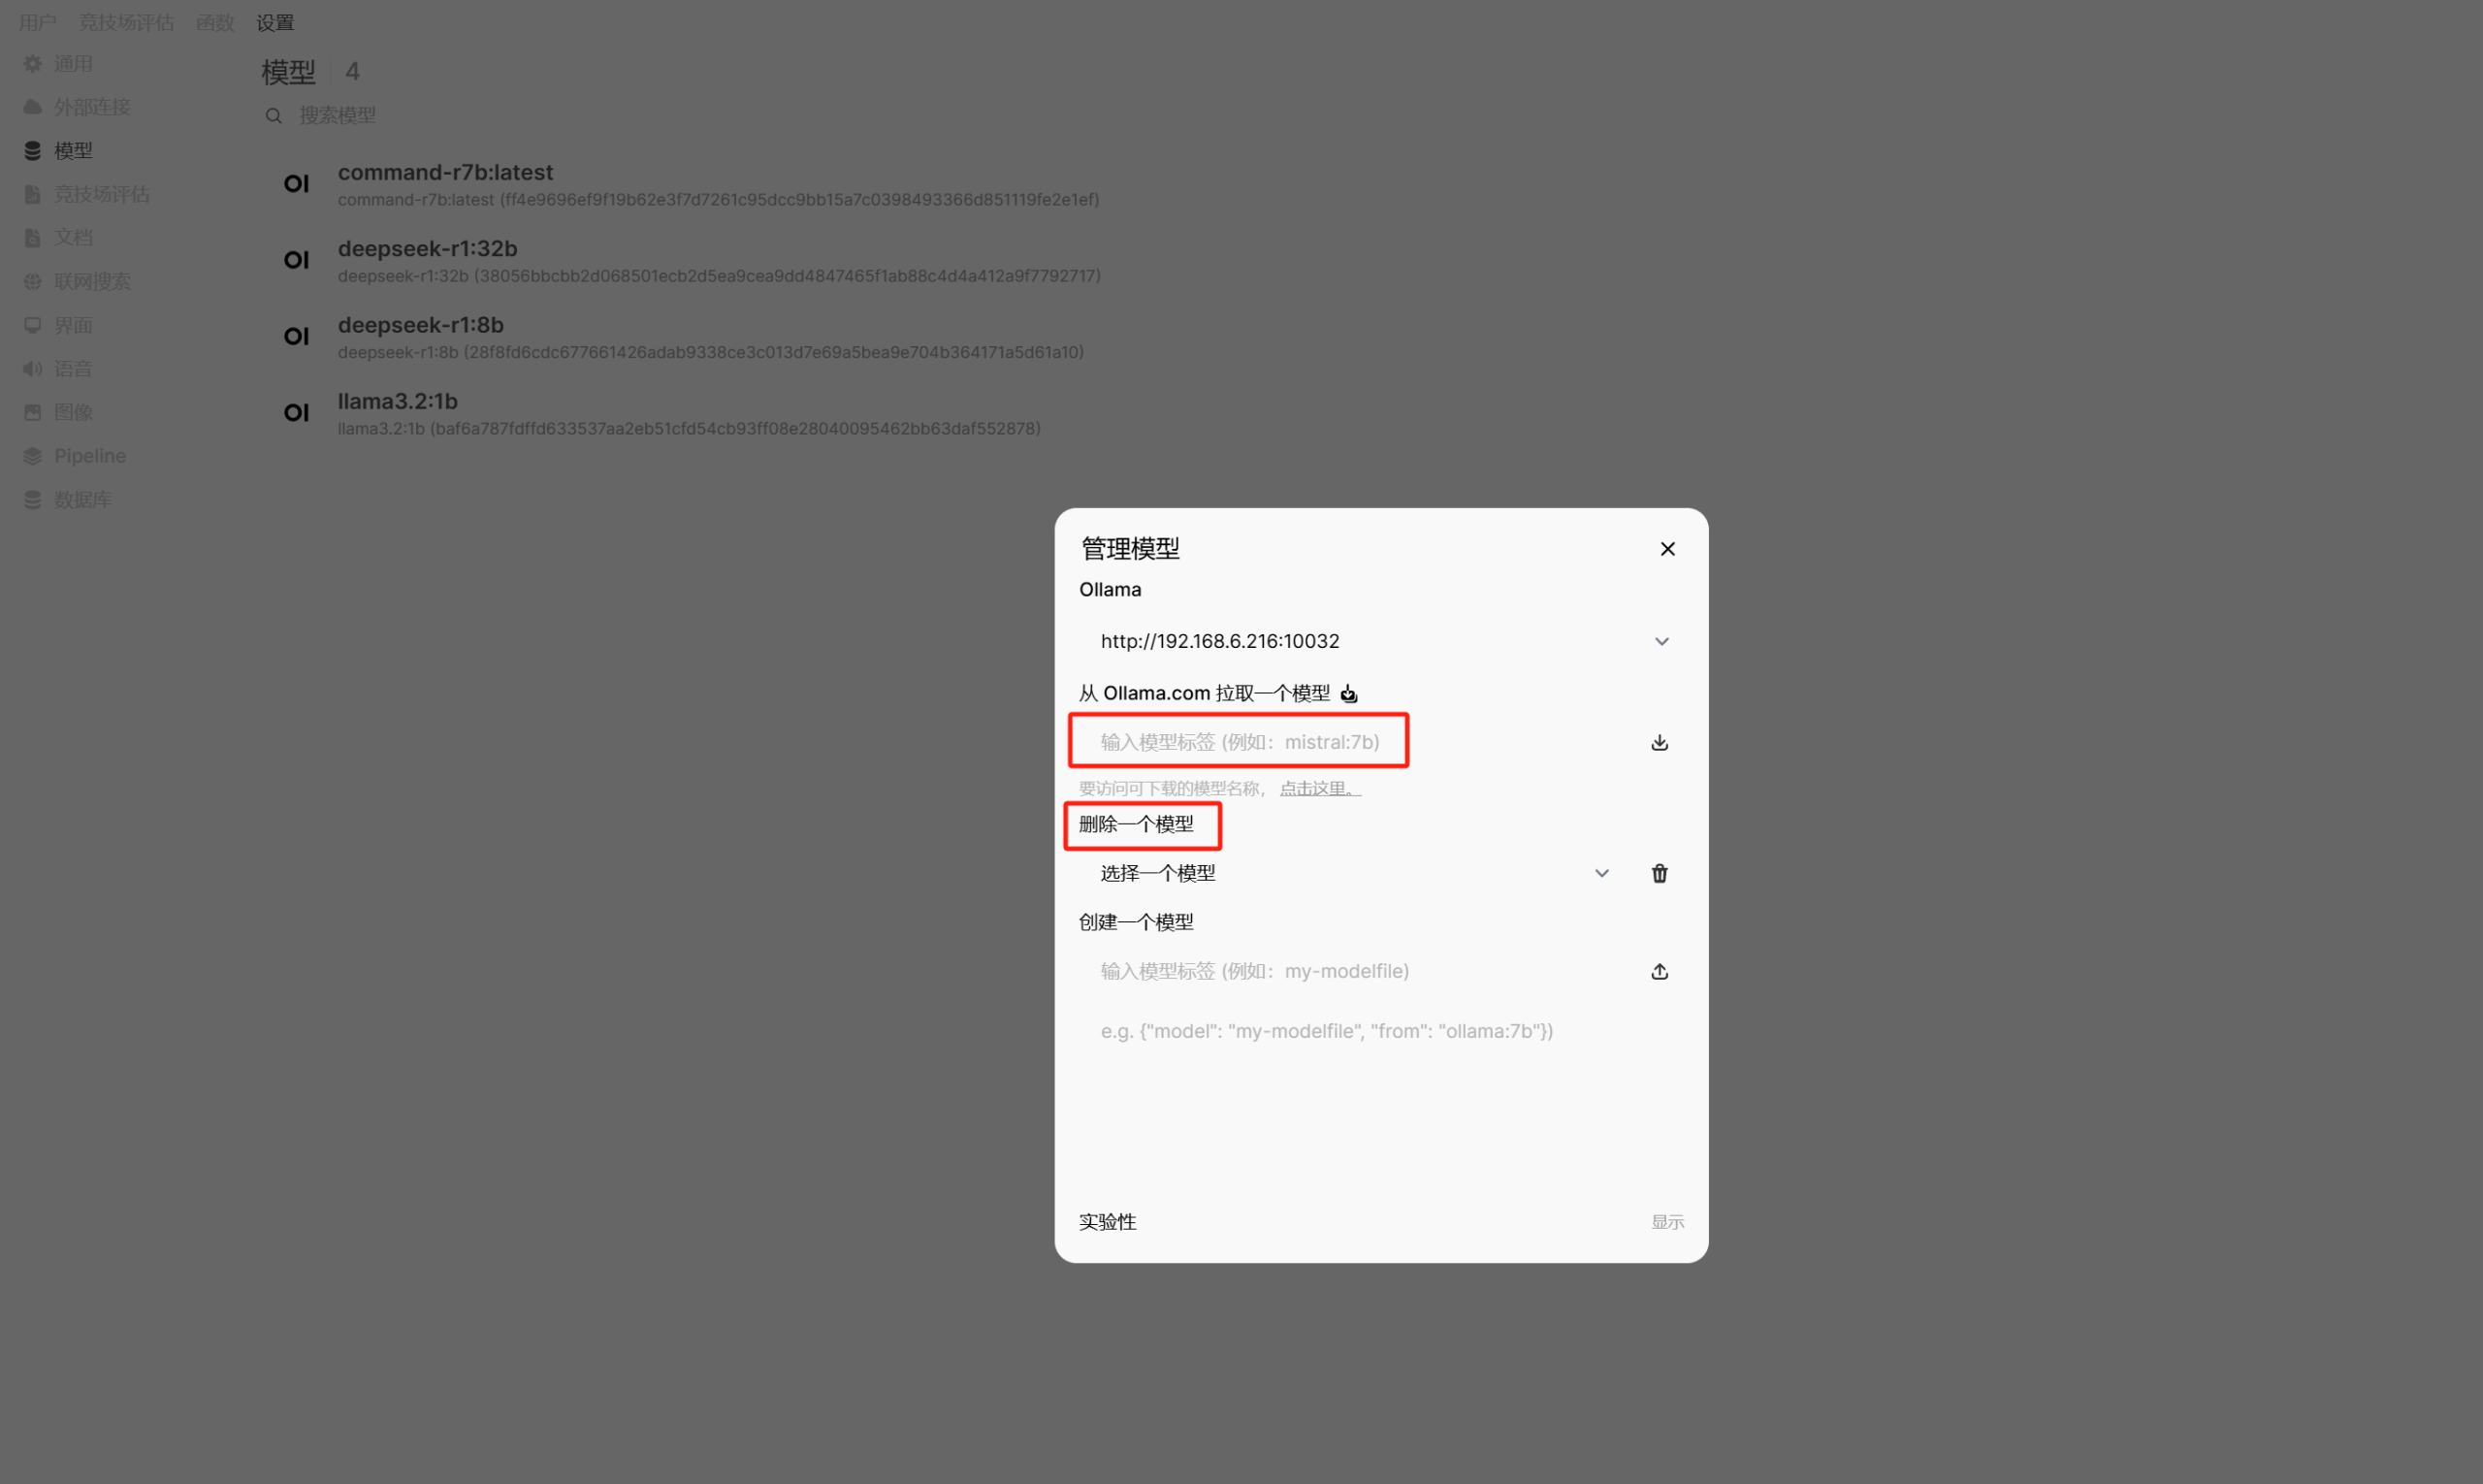
Additionally, you can pull new models and delete unwanted ones in the admin panel.
There are more detailed features that I won’t elaborate on here; you can explore them slowly on your own.
If you use a 24-hour local host (such as a Mac Mini Pro) + NAS deployment, or if the entire Ollama + Open WebUI is deployed on a high-performance cloud host, you can also bind a domain name through reverse proxy to achieve external network access anytime, anywhere.
Enjoy!